Free Water Filter


by birdfish


Well it's not really free, but close to it, and you have to build it. But it is so easy, cheap, and effective, you can't do better without spending a fair little bit of money. And, your per gallon cost of good clean freshwater is a fraction of other methods. 
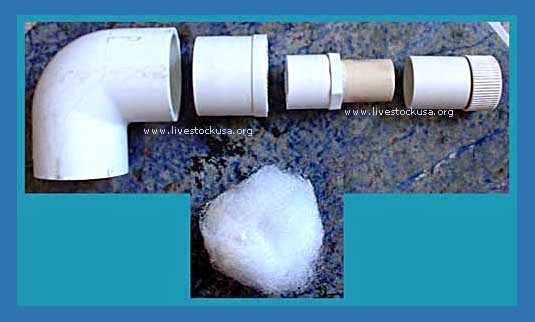
It can be built in an hour for less than $20 and produce absolutely aquarium grade, acceptable freshwater for pennies a gallon.

First I'll rant about water filters in general for a moment. Many people use De-Ionized (DI) or Reverse Osmosis (RO) water for their salt mixing base freshwater. For many people this is the only way to get good clean water free of silicates, phosphates, and other things you don't want to start with and that shouldn't be in our dang drinking water in the first place! Things you'll be buying stuff to remove later.

Both of these types of filtration are expensive to buy and to operate (per gallon costs). DI is medical grade sterile water. Not much like the ocean, would be my guess. In essence, you add everything to it to "re-constitute" or fix it back up after the process for use. RO likewise is very sanitized mineral and element free. Being a low-tech guy they seem "too clean" in some ways for my tastes, compared to nature. Yes it gets all your metals out, and then some, but is it the necessary minimum?

I have kept freshwater and saltwater fish for decades, on the east coast, the west coast and in the central U.S., with neither of the above systems, so therefore would say they are not absolutely required for success everywhere. If you live in an area with really bad water, they might be the only way though. They have their place, where the water is bad for fish. Then you probably shouldn't be drinking it either !!

For many people their water is simply not THAT bad to begin with that it must be surgically molecularly altered to clean it up. For them, there is an easy, cheap, and very effective way to make your own clean base freshwater for mixing without spending a fortune, and that is what we want to share with you.

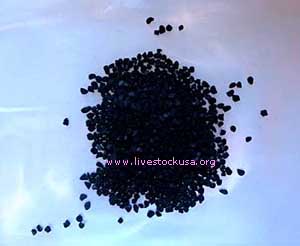
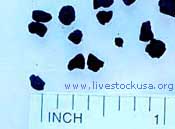
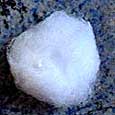
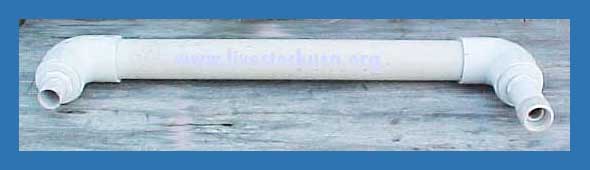
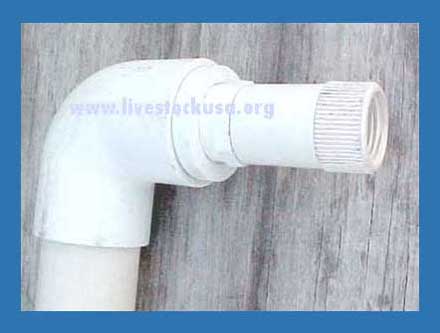
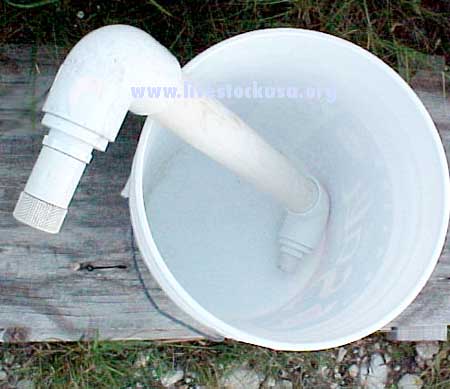
Here is a simple design idea for a water filter that will give you "glacier melt" grade, pure water.


BUILDING THE FILTER  -  Parts and Materials


Filter Housing Materials needed:


Pipe -

1 piece - 2-foot length of 1.5" PVC schedule 40 pipe

Note: Obviously, you could use 20" or 18" too, but I wouldn't go any shorter than that.

2 pieces - 3" length of 3/4" PVC schedule 40 pipe


Fittings (all slip) -

2 pieces - 1.5" PVC Elbows
2 pieces - 1.5" to 3/4" adapters
1 piece - 3/4" to hose fitting adapter


Wash all the fittings being sure to remove any price stickers and their glue, especially if they are where the fittings seal (sides). A dry thumb will often work well for that.

You often have to buy PVC in ten-foot lengths, but ask your fish store, grandpa, or plumbing shop for two 3" pieces of 3/4" pipe and a 2-foot piece of 1.5" if you don't want the extra pipe. If your plumber or plumbing shop will give you some, buy the fittings from them.


External Materials Required:

One Water Hose - Do not use the green garden variety hose to make good clean water with. Many of these are made with recycled materials of who knows what. Most are marked "not for drinking water." What you need is a good "drinking water" hose. They are usually white, and you can find them in the camper/camping or marine/boat department. The filter will not positively take out whatever might leach from cheap non-drinking water hoses.


Tools You Might Need:

1) Hacksaw or small power jigsaw for cutting the PVC to length, if necessary.
(Do so now if need be)

2) Mallet (rubber) to pound pieces together well


Big strong men might be able to just press it together sufficiently to hold it; otherwise use the mallet. Remember you'll have to take it apart when changing the carbon!  

And it will build a little pressure when in operation.

This unit will not be glued together, only pressed (pressure) together so the PVC glue won't be used.


Filter media needed:

( 1 )

The highest grade, best carbon you can afford


( 2 )

Filter wool-floss spun cotton stuff


( 3 )

Chemi-pure type polymer pad for chemical removal


Next ...


BUILDING THE FILTER - Assembly

Building the filter ...
Assuming you have all the parts together in front of you:
Let's assemble the beast, shall we?


Water Filter Parts

From left: the elbow (which gets packed solid with wool); then the step-down adapters (two in this case); then the 3-inch long 3/4" pipe stub that finally the hose adapter fitting goes on.


NOTE: If they don't have a 1.5" to 3/4" adapter, you may have to use a 1.5" to 1", then a 1" to 3/4" as shown here.


Take one elbow (let's start with the top elbow) and stuff it pretty hard packed with the wool-cotton-polyester synthetic fiber whatever stuff. This is the mechanical filtration. This elbow will be at the inlet and get very dirty, very regularly and will need regular changing of the wool at this "entry port" (top) side. You will likely be surprised what the first layer catches! Do not look at it under a microscope or you will never drink city water again.  

In the other elbow - the exit or bottom side, stuff it hard only half way or a bit more. Cut a circular piece of the Chemi-pure (polymer) pad and insert it into the elbow, and finish by packing wool outside of it. Now, remember which one has the pad because you only want it being used after everything else has been cleaned out of the water - the last stage or step of filtration.

Water Filter

Take the bottom elbow (with poly pad) and insert the 2-foot long piece of 1.5" pipe into that bottom elbow with the poly filter pad. Always twist PVC as you put it together, glue or not. Take the rubber mallet and pound on top of the 2-foot long piece to seat it all the way into the elbow. Now fill the tube with carbon. Stop a couple of inches from the top and put a wool plug above carbon. Once I didn't have the wool in the bottom elbow tight enough and the carbon weight pushed it out as I poured, and carbon went all over the floor (quit laughing), so now, I cover the bottom opening of the elbow with my hand now, just in case, while I pour the carbon into the 2-foot pipe. It takes a pound or two of carbon to fill the pipe I think ... never measured and always using big bulk bags, so don't know.

Then put the top elbow (stuffed with wool) on the 2-foot pipe, and use the mallet to make sure it is well seated on the 2-foot long (now carbon-filled) pipe. Now you have two elbows on the pipe - be sure to remember which one is top and bottom. I like to have them aligned the same way, and always make the lettering on the 2-foot pipe read downward so I know what end is up   (smile)  !

Next, insert the two 1.5" to 3/4" adapters into the open ends of both elbows. Use the mallet and pound them in.

Water Filter


Now you have a very standard 3/4" format to work with. Insert the two 3/4" pipe pieces (the 3" long pieces) into the 3/4" hole. Pound them in with the mallet too. Don't beat them to death, just gently tap them down to seat them firmly. You'll feel when they are fully seated. Hopefully you can find the 1.5" to 3/4" and not have to use two stepdown adapters (1.5 to 1" and 1 to 3/4") as shown here.

This filter has 2 stepdown adapters as explained earlier, not a 1.5 to 3/4" as explained in the instructions.

On the top end, put the hose adapter fitting on the 3/4" stub. Put the unit in a 5-gallon bucket, screw the drinking water hose to the fitting which will seat and seal when you tighten it up.

Water Filter and Bucket


You are ready to make water.

The key to the effectiveness of this filter is flow rate during filtration. Only one rate works: SLOW !! If you have good water pressure you might blow the thing apart if you turn it on high anyway. The water should be dripping at a nearly countable rate or just barely faster. It should be a trickle. A seep. Like a dripping faucet. The water flow should be as low as you can get it to move.

When you first turn it on it will take a while for water to fill up the tube, carbon, and wool, and even start coming out. Patience my friends. It is critical you adjust it to the slowest possible flow. Remember a drip a second is many gallons in a day. Don't leave it on in the house and leave! Out in the garden, fine. I have used both methods. Only one will get you sleeping in the house on a bed.

The magic is in the slow flow, which builds up pressure within the tube, forcing all the water through all the carbon, which is one of the best chemical filtering agents known. It takes out just about everything. Of course, the water was *supposed* to be clean when it was delivered, but as you will see in cleaning the topside entry port wool regularly, there's a mess a stuff in it! Note 20% of America's drinking water supply does not meet federal standards in one way or another!!! Of course, after the prefilter, the carbon and post filter, the chemi-pure poly pad removes any remainder of what we might consider noxious chemicals that might have gotten by the carbon that we don't want to start a "new aquarium water mix" with.


VOILA !! Snow melt !

For pennies a gallon!


I use a couple of 5-gallon (or larger if you use a lot) buckets for storing already to go clean freshwater. Best are the ones that really seal well when storing.

Remember to regularly check the inbound entry port cotton/wool and keep it clean. How long the carbon lasts will vary with the grade of carbon you are using and the volume of water you are cleaning. Using a very high grade of carbon, at least a thousand gallons can be filtered without thinking about checking the carbon. Check the poly pad when changing carbon.

To change the wool filters, pull the whole elbow assembly (elbow to hose adapter or elbow to stub) off the 2'-long carbon-filled pipe as one piece rather than disassembling each part. Remove and replace wool. It is easy to change the carbon when you have one of the elbows off. Just pour it out and replace with new. The bottom exit port will not appear to need much changing but you might as well change the wool when you do the top entry port. Bacteria might be on it. The poly filter is good until it visually turns color.

If you know your water has a certain something evil in it, you can probably get a polymer pad that will remove it, and add that to the final step stage. Be creative. Find out what you do have that you don't want in your water. There is something to remove it that can easily be inserted to this filter - but always at the bottom as a final stage.

Happy H2O !

~birdfish


Related articles ...


Our Toll-free Phone:


(866) 874-7639

(855) 225-8086


Monday through Friday from 9:00 a.m. to 5:00 p.m. (Central Time)


Our E-mail
birdfish@livestockusa.org


Phone: (866) 874-7639 or (855) 225-8086
E-mail: birdfish@livestockusa.org
Mon-Fri, 9am-5pm Central


© www.livestockusa.org, 2006-2024